Jack of all that is Microsoft, Master of None

November 18, 2010

BCS External List Error – The username returned by the Secure Store Provider is not of the form ‘Domain\user’

Wow, has it been a while since I last blogged.  But now that SharePoint 2010 deployments are in full swing, I expect to be getting back into the blog swing of things.  So on to my first 2010 post regarding an error I ran into this evening when setting up an External List using BCS.  Essentially I wanted to allow CRUD operations against a SQL database – nice simple implementation to start things off.  I went through and successfully created by Secure Store Provider Service Application, setup the external content type within SharePoint Designer, and then created the External List through the web UI and specified by new external content type: 

I then granted rights to this new cType in Central Admin because I was getting the ‘Access denied by Business Data Connectivity’ error.  This error went away, but then came the following:

The username returned by the Secure Store Provider in not of the form ‘Domain\User’.

So in usual fashion, I put this line into Google and found one post that mentioned an iisreset fixing this error.  Tried that, no go.  Thinking cap on… and then it hit me… when I specified my username for the Secure Store Service Application via the Set Credentials link:

In the username field I had specified the AD account name, but not the domain name:

So in the end, it was something simple – just make sure to include your DOMAIN\username when specifying an AD account in the credentials for your Secure Store Target Application.  Hopefully this saves someone a bit of time and some hair.  Enjoy 2010!

October 16, 2009

SharePoint Content Deployment Successful, but Throwing Event IDs 6398 & 4958

Filed under: MOSS 2007, SharePoint 2007, Web Content Management — Tags: — cregan @ 12:28 am

Recently, I launched a public-facing site with a client that utilizes content deployment.  Every 15 minutes, changes from their ‘Content Authoring’ (internal) environment are published out to their read-only Production environment.  For well over a month, things have been working very well, with no errors.  Suddenly the other day, I noticed two events being thrown every time the content deployment job was run:

contentdeployment

Event ID 6398 from the Timer job detail was:

Log Name:      Application
Source:        Windows SharePoint Services 3
Date:          10/15/2009 11:45:15 PM
Event ID:      6398
Task Category: Timer
Level:         Error
Keywords:      Classic
User:          N/A
Computer:      SERVER

Description:
The Execute method of job definition Microsoft.SharePoint.Publishing.Administration.ContentDeploymentJobDefinition (ID 809108c8-7685-46b1-9580-7fa68113a364) threw an exception. More information is included below.

ContentDeploymentJobReport with ID ‘{00000000-0000-0000-0000-000000000000}’ was not found.
Parameter name: jobReportId

Event ID 4958 from Content Deployment had the following detail:

Log Name:      Application
Source:        Office SharePoint Server
Date:          10/15/2009 11:45:15 PM
Event ID:      4958
Task Category: Content Deployment
Level:         Error
Keywords:      Classic
User:          N/A
Computer:      SERVER

Description:
Publishing: Content deployment job failed. Error: ‘System.ArgumentOutOfRangeException: ContentDeploymentJobReport with ID ‘{00000000-0000-0000-0000-000000000000}’ was not found.
Parameter name: jobReportId
   at Microsoft.SharePoint.Publishing.Administration.ContentDeploymentJobReport.GetInstance(Guid jobReportId)
   at Microsoft.SharePoint.Publishing.Administration.ContentDeploymentJob.get_LastReport()
   at Microsoft.SharePoint.Publishing.Administration.ContentDeploymentJob.get_SQMDeploymentJobFlags()
   at Microsoft.SharePoint.Publishing.Administration.ContentDeploymentJob.CollectSQMData()
   at Microsoft.SharePoint.Publishing.Administration.ContentDeploymentJob.Run(Boolean runAsynchronously)
   at Microsoft.SharePoint.Publishing.Administration.ContentDeploymentJobDefinition.Execute(Guid targetInstanceId)’

Now what I found really strange was that even though these errors were being thrown, the content deployment job was running successfully.  The history showed all objects were being exported/imported properly, ‘Successful’ was listed for the status, and the content managers were seeing their changes.  So it was looking like these events were false.

I did some digging through the SharePoint logs after I turned on verbose logging for content deployment, and nothing other than what was already being reported in the Event Viewer could be found.  So I took things one step further – I went over to the SharePoint_Config database, and performed a lookup of the Content Deployment Job Definition GUID from event ID 6398 against the TimerRunningJobs table:

SELECT * from TimerRunningJobs
where jobid = ‘809108c8-7685-46b1-9580-7fa68113a364’

 And what I found was very interesting:

SQLCDResults

As you can see, the error is related to the Content Deployment Timer Job for Quick Deploy… but in this particular implementation, we are not using Quick Deploy. 

So… I disabled the Quick Deploy jobs in Central Administration for my Content Deployment Path, and voila – the events stopped coming up!

QDeploy1

July 24, 2008

Got Long MOSS Service Account Names?

Are you planning on creating and using some long-named MOSS service accounts?  Maybe something like TestMOSSMySiteAdmin01 or TestMOSSSSPAppPool01?  Well if you do, then take note – I’ve had two separate occasions where I have an AD account with more than 20 characters as the username, and MOSS isn’t happy about it.  I ran across this a while ago at a client site and thought it was something wrong with their environment, and let it slide… but my buddy and fellow B&R colleague Mr. Bob Fox ran into this yesterday, and was quite surprised that this happens.

So here’s the deal…

You’ve got your account, ‘TestMOSSMySiteAdmin01’ – you go and create it in Active Directory, typically by just specifying the Full Name & User Logon Name, and your screen looks something like this:


Notice a couple of things here:

§  The user logon name is exactly what I want – the full account name.

§  But the ‘User Logon Name (per-Windows 2000) has been truncated by one character (character #21)

So now we hop over to our MOSS environment, as we want to bring up a new Web Application for our MySites, and use this account.  We run through the typical web app setup, and specify the full username:


But when we submit this information, we get a username/password combination error:


Event thought I’ve entered everything correctly. 

So after ripping my hair out, this is where the Active Directory account’s User logon name (pre-Windows 2000) comes into play.  From what I can tell, this is what MOSS is using when you input a username – so in this case, I have to truncate the name of my service account in the web application setup form:


Notice that I had to cut off the last number – to match what AD was showing.  Now, when I submit this, my web application gets created properly.  And to verify that it took the shortened name, I open up IIS, and voila – using the truncated account logon name:


And while I’m running Server 2008 with IIS7, I have confirmed this is the same on Server 2003 with IIS6. 

So in the end, the moral of the blog post is that whenever you can, keep your service account names to under 20 characters.  If you can’t beware of this issue.

-Chris

Technorati Tags:
, , , ,

July 17, 2008

The International SharePoint Professionals Association (‘ISPA’) is Live!

I am really proud to announce that the International SharePoint Professionals Association, aka ‘ISPA’, has officially gone live at http://www.sharepointpros.org.  This has been a work in progress for the past few months by Bob Fox, Natalya Voskresenskaya, Darrin Bishop, and myself.  It’s been a lot of fun and a lot of hard work, but it’s come a long way.  We look forward to working with entire SharePoint community on many exciting initiatives in the near future!

Below is our official press release…

The International SharePoint Professionals Association, also known as ‘ISPA’, is an independent, not-for-profit, community-driven organization dedicated to support SharePoint professionals and groups all around the world.  The primary mission of ISPA is to promote the global adoption of SharePoint Technologies by providing support and guidance to the SharePoint community as a whole – by establishing connections between SharePoint professionals, groups, resources, education and information.  ISPA is led and supported by volunteers across the world, and will focus on bringing the entire SharePoint community closer together.


ISPA’s first offering to the community is support to user groups around the world through free WSS v3 web sites for any group that becomes ISPA-affiliated.  In addition, one of the goals of ISPA is to facilitate an exchange of ideas between user group leaders that helps increase the likelihood of their group’s success.  Therefore, ISPA is providing leaders of user groups with access to collaborative spaces where they can interact with other user group leaders, sharing ideas, resources, best practices, guidance, and most importantly – support for one another.


ISPA has also established Regional Evangelists – existing community leaders who have previously exhibited a strong commitment to the promotion of the SharePoint community, and who have pledged to carry the ISPA message throughout their particular region.  These evangelists are key local contacts who are available to work with local SharePoint professionals and user groups throughout their region to help promote the community and SharePoint.  If you are interested in starting a user group, have an existing one, or need guidance – the ISPA Regional Evangelists are great resources who are available immediately to assist you.


Finally, as everyone knows, no community is complete without a web site, and ISPA is proud to announce the launch of its official site, http://www.sharepointpros.org.  While the web site is still in the early stages of development, plans for multilingual support and exciting functionality that will assist anyone involved with SharePoint are on the horizon. 


If you have ideas for ISPA, would like to start a user group, or are looking for assistance, visit the new ISPA web site or contact ISPA at contactus@sharepointpros.org.  Together, the community can achieve what was impossible as individuals – becomes a part of ISPA today!

Technorati Tags:
, , ,

June 8, 2008

Some Happenings, New CodePlex Project and More

I’ve been swamped with a few big projects lately, but I wanted to alert everyone to a couple of happenings:

  • I’m down at TechEd 2008 IT Pro this week in Orlando until Thursday afternoon with a few other members of the B&R Team – Jason Medero, Michael Lotter, Bob Fox & Josh Carlisle.  If you’d like to get together with any of us and talk SharePoint, feel free to ping me on the blog or via email – chrisr (at) bandrsolutions (dot) com.
  • Monday night is the famous ‘SharePoint by day, SharePint by Night’ event… more information on it can be found here on Bob’s blog and here on AC’s.  I’ll be there with the guys mentioned above.
  • Jay will be running the SharePoint 2003 -> 2007 Migrations Birds of a Feather session on Wednesday, June 11 at 6:30PM… it will run about an hour, and Jay will be more than happy to stay after and answer all of your questions (as long as you take him out for a drink).  Jay has done more migrations then I can count at this point, and all of different sizes.  He is a great resource to talk to (or bring it to your shop) if you need some assistance. I highly recommend this BOAF session if you are thinking of making the jump to 2007 from 2003, or you are in the middle of it.
  • My BOAF session – ‘Microsoft Office SharePoint Server 2007 and Windows Server 2008: What a Match’ is on Thursday, June 12 at 10:30AM.  Some more information on this session:  “With the launch of Windows Server 2008, there have been many discussions in the SharePoint community around whether or not SharePoint farms should be upgraded to the latest and greatest server operating system, or if administrators should take the “wait and see” approach. Based on experience so far, the answer is pretty clear—by upgrading, your life as an administrator is going to be made easier, and you will see performance gains with SharePoint. This Birds-of-a-Feather session focuses on both the technical and business drivers for upgrading sooner instead of later, and how you can go back to your manager and make a convincing argument… one that will not only save you time, but will end up helping your organization as well.”  I hope to see you there!

And then on another note, I’ve been working with Josh Carlisle on the AMD Developer Cental site, http://developer.amd.com, and Josh just released a really cool feature – ‘SharePoint Smart 404’ on CodePlex, which got its roots from the work we’ve done for AMD.  Essentially, instead of giving your users the same old boring 404 page when they type the wrong URL, the ‘smart 404 page’ will provide them with search results based on the url they were trying to hit.  To see an example of this in action, try hitting the site http://developer.amd.com/processors – this Processors site doesn’t exist – but note that you now have relevant search results around the word ‘processors’ (note the ‘Best Bets’ area).  I look forward to contributing to this project.

Until the next post,
Chris

Technorati Tags:
, , , , , , ,

May 9, 2008

WSS Navigation – Flyouts, Security Trimming & Custom Nav Items

I’ve been working with a client on a WSS site deployment, and one of our big sticking points has been with the out-of-the-box WSS navigation. The client set the following requirements for the navigation:

  1. Must be security trimmed – so if you don’t have access to a site, you don’t see it in the nav
  2. Must allow for the addition of custom navigation items
  3. Must have flyouts (drop-downs) that go at least 2 or 3 levels deep

Out of the box, we get #1 & #2, but since we’re not using MOSS, we can’t just modify the master page to get #3 to work.  That’s where my buddy the SharePoint Cowboy, Eric Shupps, found a nice way to add the drop-down menus to WSS.  The problem is that this approach switches the data source, and you lose the ability to specify what appears in the navigation.  So while you gain #3, you lose #2.  Talk about one step ahead, one step back.

So after some trial and error, some searching and enlisting the help of Josh Carlisle for a few lines of code, I have a solution…

The solution involves the following:

  1. Creating a WSS list that will manage you navigation.
  2. Implementing the Cascading Navigation web part from CodePlex.
  3. Adding a couple lines to your master page.
  4. Go wild!

So, in detail, here is what you need to do:

#1 – Setup your Navigation List

 The first thing you will want to do is create your navigation list.  It should be a Custom List, and I named mine ‘WSSNavigation’, but feel free to call yours whatever you would like.  I also do not display mine in the Quick Launch.  Once the base custom list is created, then create the following fields:

Note that for Item Level, your choices should only be Level 1, Level 2 or Level 3 (include spaces).

And for Display0 (make sure there is a zero!) the choices should be Yes or No.  Do not use a Yes/No field.

Now, go ahead and add a temporary line or two into the list.  Make sure that your Link ID is unique for each line… think of it as your primary key for each navigation item (it should just be an incrememental number… start at 1 and keep incrementing).  And if there is no parent of the item you are adding, keep that field blank.

#2 – Install the Navigation

Download the Cascading Nav WSP from CodePlex here:

http://www.codeplex.com/sharepointnavigation/Release/ProjectReleases.aspx?ReleaseId=9461

Install & deploy the solution package as you normally would.  Then, dump the web part on to a page & in the web part Miscellaneous properties, put in the name of the SharePoint list holding the navigation information under the Admin List field.  In my case above, I would input WSSNavigation.

If the navigation renders properly, then you are good to move on to step 3.  If it doesn’t, make sure you’ve put the in the correct name of the navigation list, and that each of the fields is set up properly. 

#3 – Modify the Master Page

So you’ve got the navigation working inside of a site in a web part zone – great.  Now, let’s replace the not so great out-of-the-box nav with our really cool nav.  Crack open the master page for the site, and insert the following line under the other lines that look the same (they will be at the top of the page and start with <%@ Register TagPrefix=):

<%@ Register TagPrefix=”customnav” assembly=”CascadingNav, Version=1.0.0.0, Culture=neutral, PublicKeyToken=9f4da00116c38ec5″ namespace=”CascadingNav”  %>

 Then, let’s get rid of the old navigation by commenting it out.  Look for the following:

<asp:ContentPlaceHolder id=”PlaceHolderHorizontalNav” runat=”server”>
 <SharePoint:AspMenu
   ID=”TopNavigationMenu”
   Runat=”server”
   DataSourceID=”topSiteMap”
   EnableViewState=”false”
   AccessKey=”<%$Resources:wss,navigation_accesskey%>”
   Orientation=”Horizontal”
   StaticDisplayLevels=”2″
   MaximumDynamicDisplayLevels=”2″
   DynamicHorizontalOffset=”0″
   StaticPopoutImageUrl=”/_layouts/images/menudark.gif”
   StaticPopoutImageTextFormatString=””
   DynamicHoverStyle-BackColor=”#CBE3F0″
   SkipLinkText=””
   StaticSubMenuIndent=”0″
   CssClass=”ms-topNavContainer”>
  <StaticMenuStyle/>
  <StaticMenuItemStyle CssClass=”ms-topnav” ItemSpacing=”0px”/>
  <StaticSelectedStyle CssClass=”ms-topnavselected” />
  <StaticHoverStyle CssClass=”ms-topNavHover” />
  <DynamicMenuStyle  BackColor=”#F2F3F4″ BorderColor=”#A7B4CE” BorderWidth=”1px”/>
  <DynamicMenuItemStyle CssClass=”ms-topNavFlyOuts”/>
  <DynamicHoverStyle CssClass=”ms-topNavFlyOutsHover”/>
  <DynamicSelectedStyle CssClass=”ms-topNavFlyOutsSelected”/>
 </SharePoint:AspMenu>

Just before it, add <!- – Hide the original horizontal nav

and after it, add – ->

Then, on the next line after the line where you put the – ->, put in the following:

<customnav:CascadingNav runat=”server” id=”customNav” Set_AdminList=”WSSNavigation” __WebPartId=”{89DFF3CB-0E4A-4623-B69B-DFB818FBF6DB}”/>

Note that under Set_AdminList= make sure you input the name of your WSS List you created in Step 1 here.

#4 – Go Wild & Create your Menu

Your site should now be rendering the menu along with the navigational elements specified in the list.  Now, head back over to your list and build out your navigation.  As you add items to the list, your navigation will be updated, so you can quickly check and make sure things are looking good.  And remember – since the navigational items are essentially list items, you can set permissions on them individually.  Therefore, you can hide links from users that shouldn’t see them.

Enjoy,
Chris

 Technorati Tags:
, , , , ,

April 16, 2008

Web Content Management – Allow reviewers to see drafts and nothing else

Scenario:

You have a public-facing site with WCM/Publishing enabled.  Active Directory authentication is used for your content creators, editors & approvers.  Your anonymous users can browse most portions of the site without logging in, however, there are some areas where they login using forms-based authentication.

Your pages are constantly undegoing changes, and you need to create an account that has access to review the draft version of pages, however, you do not want them to see the Site Actions button or the Page Editing Toolbar, or have the ability to create any new content.  Essentially, they are the most basic of content reviewers – the only ‘elevated permissions’ they have over an FBA user is that when they browse the site, they see the latest draft of every page, instead of the latest published version.

The Typical Solution

So in most situations, you would turn content approval on within your page libraries, and then add this user to the <SITE> Members SharePoint group, where they would be granted contributor rights, and could review the page drafts.  They would be able to edit the drafts, but since content approval is turned on, anything they modify won’t go anywhere without approval.  But they are contributors, and can create new content (that they cannot publish), and they still have access to the Site Actions menu, even if the functionality available to them is significantly limited.  In the majority of cases though, this setup works exactly as needed for most organizations.

Our Scenario’s Solution

In our case, we need to create a new Permission Level:

1.  Browse to Site Actions -> Site Settings -> Modify all Site Settings -> Advanced Permissions.

2.  Click Settings -> Permission Levels.

3.  Click on the actual ‘Contribute’ link.

4.  You will now be presented with a page listing all of the permissions for contributors.  We want to make a copy of this permissions set, and then modify the new permission level.  Scroll down to the bottom of the page and click on Copy Permission Level.

5.  A new page will appear where we can now customize our new permission level.  Give this level the name of Draft Reviewers, or whatever you see fit.

6.  Then, make sure only the boxes checked in the images below are checked on your page.  This will ensure that any users granted this Draft Reviewers permissions level will be able to see drafts but not do anything else ‘elevated’ within the site.  Once you have checked (and double checked) your settings, click Okay.

7.   Once the permission levels has been created, go back to Permissions in your breadcrumb.

8.   Now we need to create the SharePoint group that will hold these Draft Reviewers and also assign them the permissions set we just created.  Click on New -> SharePoint Group.

9.  Give your group a name (such as Draft Reviewers) and then make sure you check the box next to the new permission level we just created:

10.  Click Okay – and congratulations, your new group is created with the proper permission based on the scenario above.  Now, add your users to the group, and when they log into the site, they will see all of the pages in draft form, but perform any other type of content management process or administrator function.

 Technorati Tags:
, , , , , , ,

April 11, 2008

More than 1 SSL-Secured SharePoint Site on 1 IP Address in IIS7

Filed under: IIS7, MOSS 2007, SharePoint, SharePoint 2007 — Tags: , , , — cregan @ 3:55 am

I was doing some work this evening on B&R’s own internal SharePoint sites, and I ran into an issue that kept me scratching my head for quite a while.  Here’s the scenario:

We have a really nice Windows Server 2008 box that runs all of our MOSS 2007 sites.  On the box, we have 5 different web applications within IIS7 – all for different purposes, such as (for example):

my.company.com -> My Sites

extranet.company.com -> Extranet Site

customers.company.com -> Customer Portal

And to save a few hundred dollars, I went and purchased a wildcard SSL certificate from RapidSSL (I really like these guys – cheap, quick, and I’ve never had a problem with them).  For those of you that are not familiar with wildcard SSL certificates, they essentially allow you to SSL-secure all of your sites, so long as they have the same root domain, which in this case would be company.com.  So the SSL cert actually secures *.company.com.  Therefore, I can have hundreds of subdomains, and only pay for the one certificate, versus explicitly-named certificates for each site.

Now, what I wanted to do was to SSL-secure each one of the three sites, but have them all function on the SAME IP Address.  I didn’t want to have to allocate 3 different IP addresses just so SSL would work without conflicts (I could have assigned each site a different port, but I wanted everything running on 443 as well).

I did quite a bit of reading online, and I found a mixed bag – some individuals saying that this couldn’t be done, and others saying it could.  Well – I’m here to tell – it can be done (and in particular, in this case, in IIS7)!  But the main caveat is that you must purchase a wildcard certificate

So here’s how you do it:

1.  Request, purchase & install your wildcard SSL certificate (make sure that in your request the common name = *.domain.extension).  A great primer on requesting & installing SSL certs in IIS7 can be found here.

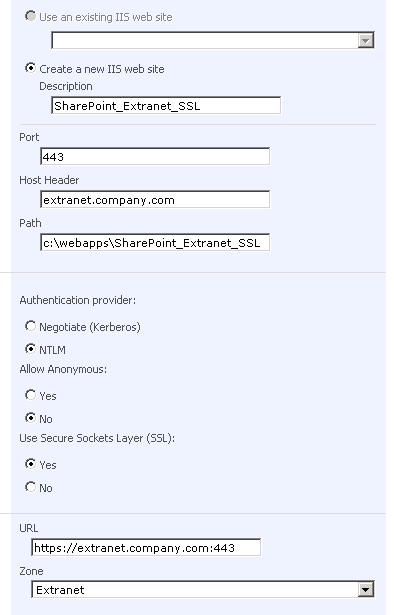
2.  You create (or extend) a new SSL-enabled web application within Central Administration.  Be sure that you specify port 443, a host header (so SharePoint knows what to respond to), and you check the radio button to ‘Yes’ under ‘Use SSL’.  The image below is an example of the settings (note, in particular, that under URL you see ‘https://&#8217; and ‘:443’ automatically added):

3. Once your new SSL web application is created, you will want to open up IIS and take a look.  Note that if you already have another SSL site up and running, that site will be stopped, since this new site is conflicting with that one (don’t worry about this).  Click on the Sites folder, and take a look at the new site you created – notice something… no host header:


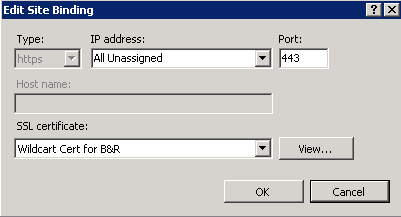
4. Okay – so no big deal, you can just edit the bindings, right?  Wrong.  Highlight the name of your site and then click on the Bindings action… and see what you get:

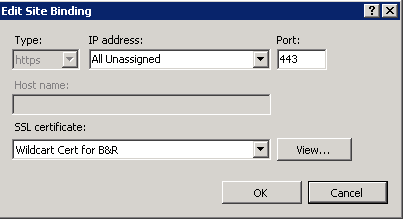
So you’ve got HTTPS, the proper port, and the proper certificate – but host name is grayed out… cripes.  This is where the command line comes into play so you can be an IT Hero again.

5.  Crack open the command prompt.  

6. Browse to C:\Windows\System32\Inetsrv

7.  You are going to run the following command:

appcmd set site /site.name:SITENAME /bindings.[protocol=’https’,bindingInformation=’*:443:’].bindingInformation:*:443:HOSTHEADER

So in my case, where my SITENAME = SharePoint_Extranet_SSL and I want the HOSTHEADER = extranet.company.com, my command would look like:

appcmd set site /site.name:SharePoint_Extranet_SSL /bindings.[protocol=’https’,bindingInformation=’*:443:’].bindingInformation:*:443:extranet.company.com

8.  If all goes well, you will receive the confirmation message:

SITE object “SharePoint_Extranet_SSL” changed 

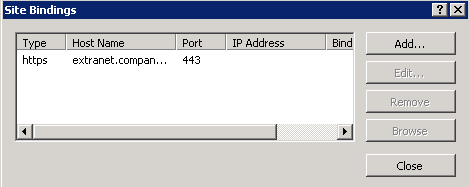
In addition, if you Refresh your Sites list, you will see:

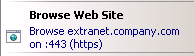
And if you highlight the web site itself and look over in the actions right-hand window pane, you can also see the SSL host header set there as well:

9.  So congratulations – your first SSL host header is configured.  Now repeat the process for each additional one under that root domain, and you’re set.


Some Important Notes:

1. This will not work if you want to use one IP address for 2 different SSL certificates under different domains (such as site.xyzcompany.com & site.yourcompany.com).  This is specifically for sites that will run under the same root domain.

2. If you receive the error ERROR ( message:Cannot find requested collection element. ) after running the command, make sure that you spelled the site name exactly as it appears within IIS.  If you still can’t get it to work, follow my alternate host header setting instructions listed below.

3. If you edit the bindings for the site you’ve performed this configuration on, you will see something like:

Which looks good – but then if you highlight that binding and click Edit, you will see:

Notice that the host name is gone – don’t worry about it – this is (I assume) because you cannot edit SSL Host Headers through the UI and must use the command prompt.  My word to the wise – don’t touch the bindings for these sites through the UI!


Alternate Instructions for Adding the Host Header Binding:

1.  Backup the file C:\Windows\System32\Inetsrv\config\applicationHost.config and then open it up in your favorite editor.

2.  Perform a search for the web site you want to edit (in my case, SharePoint_Extranet_SSL).  Your search should find the web site along with some related configuration data, just like what you see in the image:

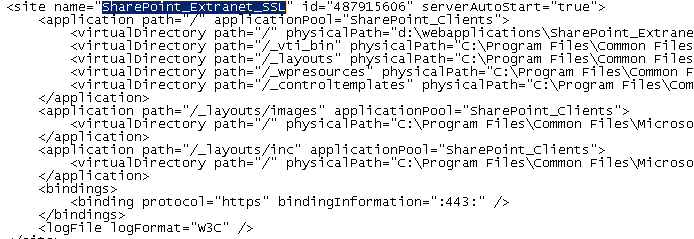
 The main area you want to focus on is between <bindings>, as you will want to add your host header after the port – “:443:hostheader” />

So in my case, the binding protocol line would like:

<binding protocol=”https” bindingInformation=”:443:extranet.company.com” />

3.  Save this file, refresh IIS, and you will see your change made.  Once again, repeat this for every SSL site, and you are set to go!

Technorati Tags:
, , , , ,

March 17, 2008

Vote for Jason Medero & Myself – TechEd 2008 – Birds of a Feather Sessions

Hi Everyone,

Well it’s been a while since my last post… but I promise that will be changing in the near term here.  I have a lot of great things to write about, and really want to get them out here.  In the interim, I wanted to ask for your vote – for my fellow team member Jason Medero & myself.  We both submitted sessions for the ‘Birds of a Feather’ Sessions at TechEd 2008 (The ITPro Track), and they are in the final running for acceptance.  All we need is for you to vote for them:

https://www.msteched.com/itpro/voting.aspx

The session Jay needs your votes on is:

Upgrades and migrations to WSS 3.0 and MOSS 2007 the real truth

We all know that upgrades/migrations are never easy. The best way to learn and understand more about how to go about approaching your organizations migration/upgrade to V3 is by learning what others are currently finding success with. This BOF session will focus on real life upgrade/migration scenarios and how best to approach them. This includes what kind of prep work should be done, use of 3rd party tools (which ones work and which ones don’t work so well) for migration/upgrade assistance, and best practices around re-architecting your new environment according to the new MOSS 2007 site structure. The main goal of this session is to really find out what works best in specific scenarios and what things should be avoided.

And my session is:

SharePoint 2007 & Windows Server 2008 – What a Match

With the launch of Windows Server 2008, there have been many discussions in the SharePoint community around whether or not SharePoint farms should be upgraded to the latest & greatest server operating system, or if administrators should take the ‘wait and see’ approach. Based on experience so far, the answer is pretty clear – by upgrading, your life as an administrator is going to be made easier, and you will see performance gains with SharePoint. This Birds-of-a-Feather session is going to focus on both the technical and business drivers for upgrading sooner instead of later, and how you can go back to your manager and make a convincing argument… one that will not only save you time, but will end up helping your organization as well.


We appreciate the votes – and hope to see you at TechEd 2008 for the IT Pro (especially at our sessions!).

-Chris

Technorati Tags:
, , , , , ,

November 16, 2007

SharePoint Gradual Upgrade – Random Page Error ‘This Page is Redirecting…’

Earlier today, I was helping a client with a pretty straight-forward gradual upgrade from SharePoint Portal Server 2003 on MSDE over to MOSS 2007 on SQL Server 2005 (no customizations performed and only 2GB of data). We got through the MSDE -> SQL side of things fine, ran prescan.exe (which reported absolutely nothing wrong – zero issues) and then installed MOSS 2007 and performed our upgrade.  Once the upgrade was completed, we tested the 2007 side, and everything but 13 links (lucky number, eh?) worked.  When we clicked on any of these thirteen links, we would get a message similiar to:

This page is redirecting to http://domain/Area/Name in 5 seconds.
To edit this URL click here.

And if you clicked on the ‘edit this URL click here’ you would get a Page Not Found error.  In addition, if you looked at your address bar, it would look something like:

http://domain/whatever/Pages/UpgLandingPgRedir.aspx

So it was obvious that for some reason, the links we were clicking on were trying to be redirected, but they really didn’t know where to go.  After doing some digging, there was a simple answer:

The area was upgraded and moved over to a new page, but for some reason during the upgrade, SharePoint kept the UpgLandingPgRedir.aspx as the Welcome Page.  So there was obviously a simple fix…

1.  On any page where this error was appearing, Site Actions -> Site Settings -> Modify All Site Settings

2.  Then in administration, under Look and Feel -> Welcome Page

3.  Note the URL of the Welcome Page… it’s pointing to the UpgLandingPgRedir.aspx… change UpgLandingPgRedir.aspx to default.aspx

Now when you click the link, it pulls up default.aspx instead of UpgLandingPgRedir.aspx.  Very simple fix. 

Note one other thing – that the UpgLandingPgRedir.aspx is going to be sitting in all of your Page Libraries where you encountered this error.  I like a nice clean environment, so after switching all of the welcome pages, I also went in and deleted that page from the page libraries (xxxx/Pages/Forms/AllItems.aspx).

Good luck upgrading!

Technorati Tags:
, , , , , ,

-Chris

Older Posts »

Blog at WordPress.com.